Audio Terminology
Microphones
Impedance
Microphones come in two general impedance categories; High Impedance and low impedance. Most professional microphones are low impedance. Take a moment to look at the spec sheet for a standard Shure SM-58 microphone. After reading this article, you should be able to understand most of the specifications of the mic. You will notice the 58 is rated at 150 Ohms. This is considered a low impedance, or Lo Z microphone. Impedance, measured in ohms at a given frequency, indicates the amount of resistance or opposition to the flow of energy that a circuit offers. Impedance is extremely important to gain structure.
Construction types
Condenser
Condenser mics use external electricity (phantom power) to polarize the back plate and the diaphragm. When sound waves strike the diaphragm, the distance distance between the back plate varies, resulting in a varying output of voltage. Condenser microphones are the most flexible, transparent, and accurate of construction types.
Dynamic
Dynamic microphones are easily thought of like a normal speaker in reverse. There is a fixed magnet that creates lines of magnetic flux. The diaphragm is attached to a voice coil. Sound waves move the diaphragm, disturbing the lines of flux which result in an output of voltage.
Ribbon
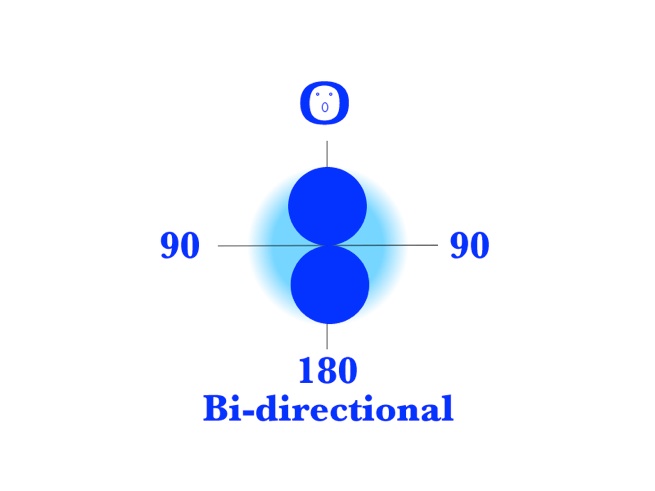
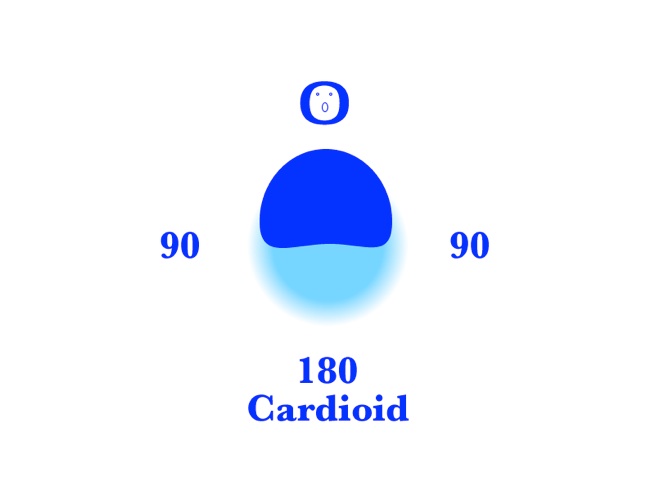
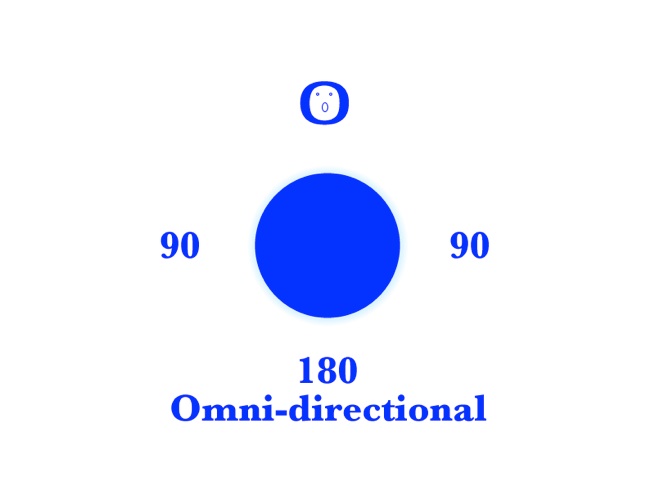
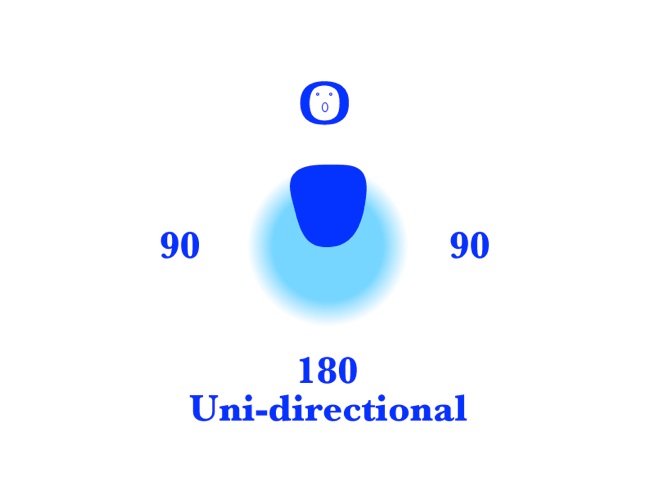
Pickup patterns
Microphones to an audio engineer, are like paint brushes to a painter. Pickup patterns refer to the way the mic "hears" sound. Hypercardioid microphones have a very tight pickup pattern, essentially the mic ignores more background noise around it. Cardioid microphones have more of a heart-shaped pattern, so it will hear more off- axis sound. Omni-directional microphones, as the name suggests, pickup sound equally from all directions.
Snakes Systems
Digital Snakes
A digital snake system eliminates the need to run hundreds of analog audio connections between the stage and the various mixing consoles in use by converting the audio signals to digital at the stage. One cable carrying all the digital information is then connected to each console usually for control purposes only.
Sub-snakes
A sub-snake is often used to bring a group of audio connections to the main snake head. A typical sub snake is a small metal box with 12 microphone connections, with a fan-out on the other end of the wire.
Splitter snakes
Spit snakes allow a single input to be split and sent to multiple consoles. For example, the lead singers voice needs to be feed independently to the monitor engineer, to the front of house engineer, and to the an additional console that is broadcasting to satellite. Why bother? Each mix position has their own unique requirements to fulfill. They must work independently, but they also must work as a team. A common split snake system will consist of a snake head, a monitor trunk, a front of house trunk, and 2 fan outs.
Snake trunks
A snake trunk is the actual runs of wire. A standard concert snake F.O.H. trunk will carry 56 audio lines 200-300 feet all in one rather thick and heavy cable. On either end their is a quick disconnect, so that you make one connection and all of the individual lines are connected at once. On the console end, a "Front of house fan-out" is used, which connects to the main snake trunk and breaks-out into all the connections that are required on the console. The fan-out logically lives with the console in "the dog house" (a boxed-in area around all the audio connections on the mixing console) so all those connections to the console can be made at once and then quickly disconnected to move on to the next show.
Snake heads
A snake head is the center of any snake system. This is where all of your sub snakes, all the individual"home-run" audio connections, and the front of house and monitor trunks connect. The snake head will normally be on stage with the artists.
Consoles
Input Strips
Gain or trim, EQ, Auxiliary Sends, Fader, Assignments, Mute Groups, PFL (pre-fader listen), AFL.
Busses
Matrix
VCA
Gain Structure
Structure defined: a thing constructed; a complex entity constructed of many parts; "the structure consisted of a series of arches"; "she wore her hair in an amazing construction of whirls and ribbons"
wordnet.princeton.edu/perl/webwn -
They key to good gain structure is understanding that it is "constructed of many parts". Good gain structure begins with the source, namely your microphone or direct input. In this example we will walk through all the steps of setting good gain structure on a vocal microphone.
Starting with knowledge
What is the microphone impedance? What is the impedance of the guitar pickup? What about the keyboard? Once you understand your source, we can understand how to run it through the snake and get it into the console. Generally the amount of loss in a good quality microphone cable and snake is relatively minimal, but using low quality wires, or using the wrong types of wires can damage your gain structure. Once the signal is to the mixing console, it must be patched into the appropriate input. The only acceptable way to ensure good gain structure is to convert everything to low impedance at the stage. Keyboards, acoustic guitars, bass guitars, high impedance microphones should all be plugged into a DI box at the stage. A DI box will convert those HI-Z instruments into XLR outputs at a low impedance. We are patching a Shure 58, so just a standard XLR microphone cord should be all we need to get the signal to the snake head.
At the console, you patch all of these balanced, low impedance sources into your balanced, low impedance microphone jacks. This only is the beginning of good gain structure. Do not confuse impedance with gain, while they are related, they are very different. Impedance is about resistance, gain is about amplitude. Gain is how hard you're sucking on the straw in your milkshake, impedance is more about the size of the straw and the thickness of the milkshake.
With the audio signal at the input of the console, we adjust the amount of gain to apply with the trim or gain control and the pad switch. This is where we adjust for the different output gains of all the instruments on stage. Our vocal microphone will have a fairly low output gain compared to the keyboard inputs. The best way to get good gain structure is to use the PFL or Solo switch which, even on the crappiest of Chinese stamped consoles, will allow the user to meter the gain level of any source BEFORE the fader controls on the board (hence pre-fader listen PFL). This is useful since we want enough gain that we can hear the source, and that the level is within the normal operating limits of the console. Too much gain will add noise, distortion, feedback, and other bad audio things. Not enough gain results in a weak or anemic sound with no punch or depth.
Metering the input with the PFL, we set our gain level to an average of about 0 db. Watching carefully for overloads
when the performer really gets down on the mic. Since our singer has a wide dynamic range (the soft parts are really soft, and the loud parts are really loud), we decide to insert a compressor on this channel to help control the dynamics a bit. Adjust the threshold setting of the comp to a little below the 0 db setting. This tells the compressor to take notice when the signal reaches that level. Set the ratio to something moderate like 3:1. Which means for every 3 db over the threshold, the compressor will only allow 1db past. A ratio of 4:1 will compress harder, a ratio of 2:1 will be lighter. Now, for the most important part, set the output gain of the compressor up 3-5 db to make up for the gain you are taking away! Failure to do this will potentially wreak havoc on your gain structure. Remember, it's all about unity.
Our vocalist's next stop is typically in the pan control. If you are only amplifying output from, say, the left output you probably should pan your vocalist hard left. The pan control distributes the energy to the L & R output buses, if you have the pan at center, half your signal is going nowhere. If you are hooked up in stereo, then panning has less effect on overall gain structure.
Finally we've reached the fader.
The most important number on the fader is 0 or Unity. This is the point in the fader where it's not boosting or cutting any of the singers voice. The signal is simply passing through the circuit. Finding the correct balance between the gain control and the fader is the heart of getting good gain. If you can barely move the fader off the bottom of the rail before the sound is ripping you head off, likely your gain setting is coming in too hot. It makes no sense to add 60 db of gain at the trim and then cut 65 db at the fader.
On to the busses, the vocal leaves the fader and is routed with assignment switches to buses of your choice. In this example, we'll route to bus 1 & 2 only, which is where I've chosen to assign all of the vocal mics and spatials for this band. At the bus we have the option of inserting more compression or a "second stage" of compression, but since I'm compressing all the vocals at the input strip, we'll skip that. But remember, if you insert any type of processor, be sure the circuit runs at unity.
We assign buss 1 & 2 to our master left & right buss. Here again, there is a fader, which should be somewhere near nominal (or unity or 0). Having you master fader too low or too high means poor gain structure, which leads to distortion, anemic sound, feedback, noise, and generally everything you want to avoid while doing sound.
Through another balanced cable, the singers voice leaves the console and enters the house EQ. Much like the strip EQ, there is plenty of room for damage here. The more powerful the EQ, the more likely a novice will destroy the entire mix. 31 bands of + or - 15 db adds up to a lot of control. Understand that each of those rails on the EQ works much like a fader on the console. If you go above 0, an small internal amplifier is boosting the signal, if you go below the 0, resistance is being added to the signal. The reason I promote subtractive EQ is simple. Take one slider on your EQ and put it to the top of the rail. You've just engaged an amplifier at full blast on that band of audio, which like any amplifier will add noise (I'll skip the discussion about phase coherency here). No big deal if you do it once, but what is important is the sum of all the noise (a little noise multiplied 31 times equals a lot of noise). Keep this theory in mind at every stage of your signal chain. Am I staying near unity, and am I adding noise? Using excessive amounts of EQ in either direction can easily destroy your gain structure. Notice that your EQ probably has a gain control. I've seen novice techs cutting 10db out of nearly every channel, but then adding nothing back with the gain control
The magic of unity!
Unity gain is essentially when the output equals the input. Gain structure is easily destroyed at the trim or gain control, and in the compressor, but the next step on our vocalists voice trip through the mixing console is also an alligator pit for poor gain structure. A ticket-able audio offence is when an engineer dials up good gain on the trim pot (potentiometer), inserts a compressor with a reasonable setting, and then goes nuts with the EQ on the channel strip.If your equalizer is totally flat, it should not be boosting or cutting any signal. If you are cutting 12 decibels (db) with each EQ control, your are drastically changing the gain structure. Try making sure your PA is correctly tuned, select another microphone, change the placement, or ask the drummer to tighten his drum head, and then consider using the strip EQ. If you must use the strip EQ, generally you should adhere to subtractive equalization, in other words, cut away what you don't like, and leave what is good. It's O. K. to boost a frequency here and there, but using subtractive EQ should always be your first choice. If you are forced to use large EQ changes, make sure you still have good gain at the compressor and ultimately with the PFL. If your fader is at the 0 point, the fader is said to be "at unity." This means the fader is not boosting the signal (adding gain) or impeding the signal (cutting gain).
Digital Consoles
The advent of high quality A/D (analog to digital), D/A (digital to analog) converters, and powerful computer hardware has given rise to the popularity of digital mixing consoles. All of the audio is converted to digital and processed with DSP (digital signal processors). The advantages of digital consoles are their flexibility and ultimately the amount of control. The paradox of digital consoles is that while people want them for their amazing ability to remember settings and their superior control capability, engineers often dislike the user interface and prefer the layout and simplicity of a well designed analog console. Certainly digital consoles have drawbacks that are slowly being overcome with better implementations of technology. Analog and digital technology constantly compliment each other in pro-audio. For example, most music is still recorded on analog tape for the warm & rich characteristics, then edited and mastered using digital technology. An interesting hybrid live console designed by Jim Gamble called the DCX avoids converting any audio to digital. Everything is kept analog except for the control systems. It is a digitally controlled analog mixing platform. Check out Digico Consoles they have a line of very popular high-end all digital solutions.
Front of House Consoles
F.O.H. Consoles mix the sound the audience hears. While essentially all sound consoles are designed on the same principles, consoles used at F.O.H. have special functionality designed around the job of mixing for the crowd. The architecture, the quality of electronics, and the ergonomics are all critical benchmarks of a good console.
Monitor Consoles
Powered Mixers
Out-Board Processing
Spatial
Dynamics
Speaker Management Systems
Amplifiers
Power ratings
Impedance Ohms
Output Configuration and connections
Speakers
Speaker Basics
Line Arrays, Point Source, Column
Conventional
Sub woofers
Monitors
In-Ear Monitor Systems
IEM systems replace the usual floor monitor on the stage with "ear-buds" the performer places in their ear and typically connects to a wireless receiver in a belt pack. The monitor engineer works with the artist who selects which instruments that want to hear and how they want them blended. In ear systems significantly reduce the amount of stage volume, making it easier to get a cleaner sounding mix for everyone. Often touring bands will have very complex mixes configured and often digital consoles become the tool of choice for their ability to quickly recall complex routing and processing. However, digital consoles are known to have a more "edgy" sound and combining this with ear buds that are more limited in frequency response will likely produce a "harsh" sound. Drummers often want to "feel" their kick drum, and therefore prefer a conventional floor monitor, and often a matching sub woofer. There are even products that essentially attach a speaker directly to the drummers throne.
Floor Monitors